
Drawing from acrylic sculpting on nails. Acrylic nail sculpting is a spectacular touch to your look. Acrylic nail sculpting master class
Volumetric design of the nail plate appeared in the nail industry relatively recently.
Original patterns are modeled on natural or extended nails with transparent or colored gel.
The compositions are perfect as the final detail of a festive or wedding look at a gala event.
Forms a three-dimensional pattern with a sculptural gel. The material has good ductility, holds the shape given by the master perfectly, does not spread and has no odor.
Creating such a composition is a labor-intensive process and takes a lot of time, but in the end the work looks truly fabulous.
- 3D gel belongs to the category of solid plastics, allowing you to create three-dimensional decorative elements of the nail plate. The material is easy to work with, and you can use it to get any desired fragment shape. The elements are made with a small brush with elastic bristles. Beginners can create simple compositions, but complex details require experience. Be sure to use finishing gel.
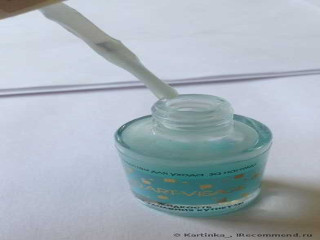
- The 4D gel is very thick in consistency, reminiscent of chewing gum, it does not dry out until it is placed under a UV lamp, you can sculpt it indefinitely - until you like the result. The colors are bright and saturated, but after the polymerization process is completed it becomes matte. Beginners love it. The material is applied directly to the top coat; it does not require covering with a topcoat.
Let's consider nail design options with sculpting on gel polish
It is necessary to work with sculptural gels with pinpoint precision so that the intended composition turns out flawless. The range of 3D and 4D gels is quite extensive, allowing you to combine colors and textures. 
A high-quality mass should not stretch, but separate freely into pieces.
Modeling technology allows the use of additional elements to satisfy the limitless imagination of clients. The following will help to complement the design: beads, shells, sparkles, broths.
Sculpting on nails with 4D gel slightly different. The palette consists of a base white and nine colored gels. White is intended to dilute neon shades - making them natural and muted. White gel is less flexible.
The blank ball is perfectly fixed on the nail.
The finished pattern is even more voluminous, bright and can be sculpted indefinitely, without rushing.
VIDEO DESCRIPTION
Applying 3D gel to nails - step-by-step instructions using flowers as an example
Gel sculpting on nails allowed us to achieve more varied designs, and the procedure itself became more enjoyable. Each detail is applied to the nail plate in the form in which it will ultimately be fixed.
Elements of the composition that differ in color are dried separately under a UV lamp, otherwise the shades will mix if they are not hardened enough.
 Step-by-step instructions for sculpting with 3D gel
 To work you will need:
- A brush with artificial elastic bristles and a pointed tip;
- Varnish base;
- Gel polish of the selected tone;
- Top varnish;
- Ultraviolet lamp;
- Dots for collecting the desired amount of 3D gel.
Modeling technology:
- A base coat is applied to the nail plate;
- Gel polish of the selected tone is applied on top of it;
- Top is applied on top and the sticky layer is removed.
- Dots pick up a small drop of gel;
- Use your fingers to roll it into a ball;
- The ball is transferred to the nail in the place where the element will be sculpted.
- The tip of the brush is pressed in the place where the center of the flower will be located, simultaneously forming a petal;
- The molded petal is dried under a UV lamp for 2 minutes, under an LED lamp for 30 seconds;
- A second portion of gel is collected, and the second petal is formed in the same way. Subsequent petals are molded according to the same pattern.
- The resulting petals are slightly shaded with the same gel polish;
- To complete the decor, the core is decorated with broths or small beads;
- After drying under the lamp, the places where the gel was applied to add depth to the color must be covered with a topcoat, and then the sticky layer must be carefully removed.
VIDEO INSTRUCTION
When working with 3D gel, you should remember a few simple rules:
- Each part of a complex composition volume is dried separately under a UV lamp, the thicker the layer, the longer, on average 3-4 minutes;
- Despite the fact that the material is dense and does not spread, if handled insufficiently carefully, individual elements can merge - during work, you must carefully ensure that this does not happen;
- A novice master does not have to buy a large set; he can limit himself to a few basic colors, since they are easily mixed and it is possible to create spectacular images at minimal cost;
- The plasticity and viscosity of the consistency allows the use of various inclusions: sparkles, rhinestones, pebbles, shells.
Don’t forget to clean the brush with a special solution so that the remaining 3D gel particles on it do not mix with the next color.
Be sure to also protect natural nails a basic adhesion coating, since the gel can damage the nail plate. If the composition is created correctly, then it does not chip or fade, remaining in its original form until removal.
For special occasions and special occasions, nail art professionals have created an unusual type of manicure - nail sculpting. Any woman wants to capture festive moments in photos, so she carefully prepares for the event, thinking through everything down to the smallest detail. A beautiful image of a lady is not only pretty haircut and wardrobe, but also an irresistible manicure, which is why women often resort to nail designs with voluminous designs.
Until recently, three-dimensional modeling was created only using acrylic, and this is not surprising. Gels for nail extensions are not able to form a three-dimensional pattern, since their structure is liquid and they spread. With the advent of new gels with a dense structure, it became possible to sculpt nails with gel.
Among the advantages of gel modeling is the absence unpleasant odor when building and decorating nails. The material has the necessary plasticity and can be used to create complex compositions, but one of the most important advantages of such modeling is the excellent decorative characteristics of volumetric decor. It seems to glow from within and resembles glass figures, but acrylic modeling does not give a similar effect.
Gel modeling, unlike acrylic, is more difficult to work with.. Despite the density of the material, each element of a different color is dried separately in a UV lamp, otherwise the colors may mix. This approach to creating nail decor is very time-consuming.
In addition, the sharp tips of the three-dimensional pattern can cling to clothing. Another disadvantage of gel sculpting is the difficulty in removing a dense pattern, since it needs to be filed off, just like an extended nail.
Basic gels:
- 3D gel, Unlike regular gel, has a denser and more flexible structure, with its help you can create three-dimensional compositions. It is this gel that is used to create the popular baguette molding, which highlights a pattern or picture with a frame border.
- 4D gel has a very dense structure, reminiscent of hard plasticine or clay. It is divided into small balls, and then a decorative element is created with hands and metal tools. The gel sticks to your hands and tools, so when working with it you need a cleanser designed to remove the sticky layer.
- Sculpting Gel is the main modeling material for creating artificial nail architecture. It is more viscous, unlike self-leveling gels. After applying the sculpting gel, the artificial nail is sanded with a file to level the surface and does not require a finishing coat.v
Sculpting nails with gel is difficult to do on your own, so it should be entrusted to a good nail service master. But if there is a desire, then by performing simple compositions, a novice manicurist can easily learn how to make molded patterns on his own.
What you will need for gel sculpting:
- special brushes;
- dots for forming a pattern;
- pusher;
- 3D or 4D gels;
- liquid for removing sticky layer;
How to prepare your nail?
Nail sculpting with gel is most often performed on extended gel nails. But it can be done on acrylic nails and coated with gel polish.
Decorating conventional varnish coatings with a three-dimensional pattern is not advisable, since such a manicure is short-lived and the coating does not stick well to the nail plates. If gel extensions were performed before creating a three-dimensional design, then you need to remove the sticky layer from the nails and then start sculpting.
Step by step technique:
 |
Step 1 |
|
 |
Step 2 |
|
 |
Step 3 |
|
 |
Step 4 |
|
 |
Step 5 |
|
 |
Step 6 |
Acrylic sculpting on nails: features of manicure
 Acrylic modeling has been pleasing women with its unusual design for decades. The acrylic extension system consists of powder and liquid (monomer).
The combination of these two materials occurs directly at the moment of building up or creating a three-dimensional design.
Acrylic powder can be colored, transparent, translucent, or contain glitter. A wide range of powder colors allows you to create bright designs to suit every taste.
Types of acrylic modeling:
- Aquarium modeling assumes the presence of a three-dimensional pattern inside the artificial nail. First, decorative acrylic elements are placed on the nail, and then the design is filled with a transparent acrylic layer. The advantage of this type of sculpting is that the nails do not cling to clothing; the disadvantage is that the nail plate is too thick.
- Volumetric modeling acrylic on nails is a more popular option. Nails look as natural as possible, and the volume of the design is perceived very clearly. The disadvantage can be considered inconvenience in everyday life due to protruding elements that cling to fabrics.
What you will need for acrylic sculpting:
- flat brushes for modeling;
- liquid;
- acrylic powder of different colors;
- napkins;
- decorative elements, glue.
How to prepare your nail?
Similar to gel, acrylic modeling is performed on extended nails (gel, acrylic) or coated with gel polish.
Step by step technique:
 |
Step 1 |
|
 |
Step 2 |
|
 |
Step 3 |
|
 |
Step 4 |
|
 |
Step 5 |
|
 |
Step 6 |
Nail design: manicure modeling for various events
 Using gel or acrylic modeling, you can create a delightful wedding or holiday manicure. To add more solemnity and shine, the three-dimensional design is decorated with rhinestones, lace, sparkles, beads and other decorative elements.
3D and 4D gels go well with gel polish, acrylic, shellac, which can be used to complement the design.
When choosing a nail design for a celebration, you should show a sense of proportion. The abundance of different decorative elements can make the most beautiful composition vulgar. This is especially true when performing manicures for a wedding celebration. Therefore, the bride is most often decorated with decorative modeling only on her ring nail, which attracts attention on this day.
Aquarium nail design (acrylic sculpting) is perfect for Everyday life . The elements of the design seem to be locked from the inside, so they will not interfere with everyday life. This option is perfect for a holiday at sea. Strong nails Sea water will not damage it, and the manicure will retain its charm for the entire vacation period.
Baguette nail sculpting is suitable for any occasion, be it a celebration or office work. A beautifully outlined drawing will delight not only its owner, but also those around him.
It is important to know that volumetric sculpting is performed strictly in the stress zone of the nail, that is, in the middle. You cannot place elements on the edge of the nail plate, as the nail may break. It is not recommended to do sculpting in the cuticle area.
Manicure is an integral part of any look; it not only beautifully complements appearance woman, but also favorably emphasizes her beauty. Manicure is especially important for special events and special occasions, because every girl dreams of leaving an unforgettable impression. For such situations, experts have come up with a special type of nail design - manicure with sculpting.
This nail art is characterized by the presence of volumetric elements that are decorated with gel and acrylic. Thanks to modern nail processing technologies, the design is perfectly smooth, so this manicure is comfortable and perfect for both everyday life and celebrations.
Sculpting on nails appeared quite recently, but has already received a lot of positive reviews and is very popular among the fair sex. If we look at the latest fashion trends, we can find many beautiful ideas decorating nails with stucco. And this is not in vain. The unique design of this manicure helps a girl always stay on top.


Peculiarities
Although manicure with modeling is considered the most fashionable and beautiful, the process of creating it is quite painstaking. A special material is applied to each nail plate, from which a pattern or design is formed, and then all this is secured with a transparent gel. Also, craftsmen often use mica, lace, foil or glitter in their works. This gives the manicure a special twist.
A manicure with modeling should not be used by girls whose work involves their hands., although it is durable, the volumetric modeling will interfere with everyday life. To apply an original pattern to your nails, you will need the help of a professional specialist. Of course, it’s quite possible to do a manicure yourself, but to design it you will need special materials and art skills.


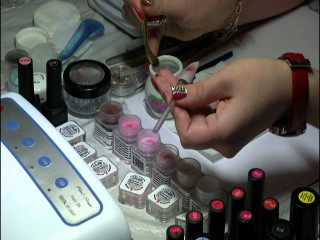
The work of applying sculpting is carried out using a special brush, monomer, cleaning agent and acrylic powder of various shades. At the same time, it is very important to choose quality products for manicure. The strength and appearance of the pattern will depend on it.
You should also be well aware of the composition of the products used., laws of combinations of colors and compositions. During sculpting, all elements of the manicure should be placed harmoniously, without touching the cuticle and fingertips.


Kinds
Unusual patterns and sculpted manicure designs are created using gel and acrylic; they look beautiful not only in photographs, but also in life. Although such nail art is not practical, because voluminous compositions can often cling to surrounding objects and clothes, it looks amazing.
In the case when a manicure is done for everyday life, the surface of the nails is additionally coated with colorless gel.
Thanks to this “aquarium” effect, the surface of the nails is perfectly smooth. For volumetric manicure, you can choose to use either gel or acrylic; the difference in their use lies only in the technological process.


Types of technological process:
- Acrylic sculpture. Manicure is performed using a modeling brush and acrylic; before starting work, you should carefully prepare your nails. Basically, modeling is intended for extended nails, but natural ones can also be suitable if their length is sufficient. Also, for a manicure it is considered mandatory to have a base or layer of varnish. An acrylic ball is grabbed with a brush and placed on the surface of the working area, then it is shaped into the selected pattern; you cannot sculpt the decor right away. The modeling will become available when the ball dries properly and loses its original shine; the decorative elements are modeled with a brush.


- Gel modeling. This type of manicure appeared much later than acrylic sculpting, due to the liquid consistency of the gel, but today experts have created a special 3D gel for modeling nails, which is easy to work with and allows you to create unique decors. Also, a positive aspect of this material is the absence of odor, so the procedure for applying the composition has become much more pleasant; all sculpting elements are applied directly to the nail in finished form and are immediately fixed. Each part of the pattern has a specific color and is subject to polymerization in an ultraviolet lamp. In this case, the composition must be kept in the lamp for two to three minutes, otherwise the shades may mix. To fix the manicure, use a transparent varnish.


More recently, a very convenient gel plasticine has also appeared. Using 3D plasticine, you can create spectacular patterns and unique decorative elements. It is easy to use and allows you to create gorgeous voluminous compositions.
You can see how to do a manicure using gel plasticine in the following video:
How to do it?
Manicure with sculpting is one of the most complex types of nail design. Creating it requires a lot of patience and skill, since the durability of the composition and the final result depend on the correct execution of the work. If you really want to, it’s quite possible to do sculpting at home.
The following work steps must be followed:
- Preparation. The nail is sold in the required shape and length; sculpting on long nails looks especially beautiful. The nail plate is carefully polished; the quality of the entire manicure depends on the evenness of the surface. The cuticle is removed so that the delicate skin of the nail remains intact; it is recommended to use a wooden stick or a special solution. Then the nail is degreased with a cosmetic solution.
- Applying the base. A colored or transparent base is applied to the base of the plate, on which the molding will be fixed.
- Modeling. It can be performed either directly on the nail or pre-prepared on the table, and then only fixed. Acrylic polymer is a liquid, so you need to work with it carefully. The brush is dipped into acrylic, then squeezed out a little and passed over the powder so that it forms a ball. This ball is placed on the nail and waited until it dries. Then you can start sculpting, using auxiliary materials in the form of a toothpick and a brush.
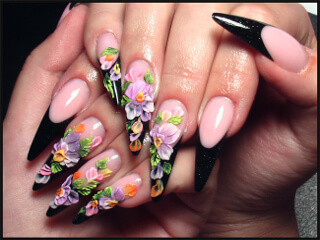
Fashion trends and the latest techniques in the world of nail art are updated from season to season: something goes into oblivion, something changes, adapting to new trends, and the sculpted nail design in the photo shows the final product of its own evolution. This technique is one of those that has been able to adapt to modern times. From large flowers and almost life-size butterflies, the sculpture has turned into a stylish design that sets the tone for your entire look.
Fashion trends for manicure with sculpting in 2018
The Internet is still awash with photos of tacky long stiletto claws or square plates with monstrous acrylic flowers. Oh, those 2000s... “Star Factory”, jeans with a low waist, and clumsy modeling on nails still won’t leave the minds of many masters.
It's high time to notice that in 2018 everything in nail art fashion trends are held under the auspices of minimalism, this also affected the sculptural decoration of nails. Nowadays, marigolds are decorated only with small-sized and not very convex decor; basically, one, or at most a couple of fingers are allocated for it.


Two types - two stars
Artistic masterpieces are sculpted from acrylic and special gel. If earlier creativity could only be done on artificial nails, now figures are often formed on natural plates coated with gel polish.


Acrylic systems
Realistic decorations are made from acrylic powder combined with a special liquid called monomer. By mixing powder with monomer, you get a plastic polymer from which you can fashion whatever your heart desires! Interestingly, this material was initially used in dentistry, and then became widely used in nail art.
It will be very difficult to independently obtain an elegant flower from polymer the first time. The fact is that it hardens quickly and therefore you will have to act extremely quickly and very, very carefully. Therefore, it is better to contact a certified specialist if you are not confident in your own abilities. All those stunning examples of sculpting flowers on nails that you saw on the pages of masters are the result of diligent study in courses and long practice.
One of the main disadvantages of acrylic is frequent allergic reactions to the material and its unpleasant odor, similar to what is felt when a dentist drills a tooth. Also, many are put off from “trying the pen” in this field by the length of the process. On average it takes 2-3 hours to sculpt.


Volume gel
Masters have been thinking about turning gel into magical sculptures for a long time, but, as luck would have it, the usual gels for extensions in volumetric art did not want to help! Their viscous nature did not want to turn into something formal.
But more recently, gels with a dense structure appeared and decoration lovers inhaled new life into the art of sculpting.
This material, unlike acrylic, has no odor and does not have to be mixed with anything. To the touch it looks like pliable plasticine, from which imagination and skillful hands create nail art. A significant plus is that the gel hardens under the influence of ultraviolet light, so the amount of time and attempts in trying to form an idea out of a ball is not limited.
The most popular types are:
- 3D gel for sculpting nails. Its dense and flexible structure is quite easy to work with, and with the help of such a gel, excellent examples of volumetric modeling are obtained.
- 4D gel is more rigid. To the touch it is indistinguishable from clay or plasticine. From a small piece with a grain of rice, you can form three-dimensional compositions with a pusher or dots. Some inconvenience is caused by the fact that it sticks to metal and hands, so the tools will have to be constantly moistened with liquid to remove the sticky layer.
Sculpting with gel will take a very long time, since each element must be dried separately in a lamp. If you connect two undried petals, they will merge into one shapeless blob.
However, there are more positive aspects in this technique. If you are eager to try to sculpt your idea yourself, then start with the simplest figures.


Volumetric art in practice: how to sculpt nails
If you still have nostalgia for the wonderful sculpting on your nails, then you can easily show your creative impulses and remain a fashion winner with new items of wonderful design.
Nail masters are strikingly unanimous in teaching beginners: you can’t do your first experience with acrylic or gel on your nails! First, try making a flower or butterfly on paper or foil, or attach the material to tips.
Acrylic modeling master class
It is believed that it is better to master the art of sculpting first of all with acrylic.
You will need:
- Acrylic powder in several colors.
- Gel polish.
- Monomer.
- Sculpting brushes made of dense and elastic natural bristle.
- Tips.
- Cover the tip with gel polish and dry it.
- Dip the brush into the monomer and place the very tip into a jar of powder.
- An acrylic ball instantly forms on the brush.
- Put him on tips. This droplet can be given any shape with a brush.
- You need to act quickly: as soon as the drop loses its shine and becomes matte, polymerization will occur and the drawing can be considered complete. The substance reacts to the air temperature in the room - the warmer it is, the sooner it hardens.
You can see in detail how acrylic sculpting on nails occurs in this video:
Master class with 4-D gel
Just recently, you would have had to pay a lot of money and sit through painful hours with the master to get Beautiful design on the marigolds. With the advent of 4-D gel, the process has become so simplified that even a beginner can create his own unique design.
You will need:
- Sculpting gel.
- Gel polish, base and top coat.
- Dots.
- Pusher.
- Klinser.
- Prepare your nails for a manicure.
- Apply a layer of base and after drying, paint with gel polish.
- After drying the pigment, remove the sticky layer.
- Use a dot to scoop the gel out of the jar.
- Using your fingers moistened with a cleaner, roll the ball into a small “sausage” and press it against the plate.
- Take two more smaller pieces of gel and place them in the area near the cuticle on the other fingers.
- Stretch the gel well on the plates and move the “plasticine” with a dot, wiping the holes, stretching it into something like lace. Do not forget to periodically moisten the rod in a cleanser.
- If desired, you can complement the decor with rhinestones.
- When the entire composition is ready, send your creation to the lamp.
- Finally, cover the result with topcoat.


As you can see, the technology is simple, in just a few minutes, remembering your art lessons at school, you get original art!
With an obedient gel, over time you will learn to create luxurious masterpieces. In the meantime, enjoy how this is done in the video:
I made it from what I had: a beautiful nail design with sculpting in photo examples
So far, the most popular sculpting designs on nails are the notorious petal flowers, but even from them talented nail artists create far from banal ensembles. At a short length, small flowers create entire fields of chamomile, and on an almond-shaped form, craftsmen create stunningly beautiful silhouettes of roses covering the entire plate. If desired, you can build a single composition on two adjacent nails, decorate your design with rhinestones...
The uniqueness of the sculpting is that this decor is suitable for any shape and length. Admire the design examples below and choose the one you like.


Of course, voluminous art is not the most convenient for everyday use. Some elements will cling to your clothing and may cause inconvenience if, for example, your job requires you to wear gloves. Sculpted nail designs, as you can see from the photo, are more suitable for a holiday manicure. Modeling in nail art is adored by brides, graduates and simply creative people. Extraordinary 3D drawings will definitely give your image originality and sophistication!
Nail sculpting is a real art in nail design. Volumetric compositions convey all the exclusivity and originality of the coating. This type of manicure is very popular among brides and occupies a significant place in modern nail decor. Amazing and luxurious versions of original nail sculpting can be seen in the photo.
Modeling ideas
There is complete scope for creativity, and every time there is a search and invention of something new. Fingers may show off:
- bows;
- flowers;
- leaves;
- patterns;
- monograms;
- symbols;
- ladybugs and butterflies;
- shells;
- animals.
Tools
Modeling is done using a special substance. In order to complete volumetric elements you will need one thing:
- 3D gel plasticine;
- acrylic;
- acrygel;
And available tools:
- brush for acrylic modeling;
- petal brush for design;
- dots;
- monomer;
- cup for monomer.
We create beauty
Nail sculpting must be done with high quality. You should not skimp on materials, otherwise it will be impossible to process small parts.
Petals using 3D gel plasticine
Sculpting must be done on a finished nail, which is completely covered with topcoat and the sticky layer has been removed from it. When working with plasticine, you must wear medical gloves.
- Use a dot to collect 3D gel and roll it into a ball. Place it in the place where the first petal (or any other element) will be.
- Use a thin synthetic brush to distribute the material, carefully pressing the petal from the middle to the edges.
- Make one petal at a time and immediately put it in a lamp to dry so as not to spoil the entire composition.
- Now pick up the second ball in the same way. Start flattening it with a brush from the center.
- Now you need to decorate the resulting composition. Apply gel polish to the palette to match the base or darker and carefully darken the middle of the petals, painting them a little.
- Mix regular micro-gloss with topcoat and apply to the middle of the element.
Roses with plasticine
- Buff a little in the place where the roses will be.
- Scoop up the gel plasticine with a pusher or a bamboo stick and place the required amount on the nail.
- Dip a straight brush in liquid for a sticky layer, remove excess on a wet napkin.
- Distribute the gel plasticine, making a circle, not pressing too hard.
- Dip the dots in clinser. And squeeze out the rose in a spiral shape in a circle. When the gel begins to stick to the dots, moisten it in a cleanser. Moving in a spiral, you need to end in the center.
- Using a flat gel brush No. 4, press down a little on the petals, starting at the edge and then moving in a circle. Try to do this unevenly to create volume.
- Decorate the finished composition with rhinestones and broths.

Acrylic flowers
Sculpting acrylic nails is done using a monomer and a brush.
- Dip the brush into the monomer. For a large acrylic ball, you need to wet the brush well; for a small one, you need to squeeze it out so that it has a sharp nose.
- Place the brush in acrylic powder.
- Place the ball on the nail and wait until the acrylic becomes matte.
- After this, mold any shape from the ball. If it is a rose, then with light slapping movements we make the layer thinner and go in a spiral.
- Use the nose of the brush to lift the petals so that the material is more vibrant and looks more voluminous.
- For the rose, take another smaller ball, place it on top and repeat the same.
- It is recommended to flatten the material a little so that the modeling is not thick.
- Apply top coat on top and inlay with rhinestones.
Acrylic sculpture.
Acrigel
Elastic mixture of acrylic and gel. This type of nail sculpting is quite easy to wear and small in height. If you don't have a special brush at hand, take a regular ballpoint pen that doesn't write. Wrap it with regular cling film. The cone in the handles will allow you to make competent petals.
- Distribute the acrygel onto the prepared nail.
- Use a brush to “cut off” each layer of the petal with smooth movements. Smooth, creating volume.
- Place the resulting composition in a lamp and decorate it to your liking with patterns or rhinestones.