
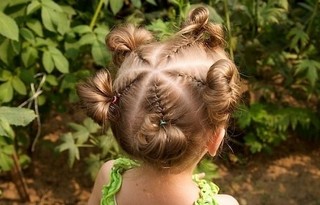
Braids for girls for long hair: braiding patterns, photos. Beautiful hairstyles for girls: the best options for ponytails and braids Examples of festive hairstyles with braids for girls
No girl can resist a beautiful hairstyle. Various braiding techniques are not in a hurry to lose their popularity, because these are the best hairstyles for girls. After carefully studying several schemes, you can create a stylish hairstyle yourself and change your look every day.
For beginners
Option #1
- First you need to wash your hair well, dry it with a hairdryer and comb it thoroughly, because for braiding the curls must be perfectly smooth.
- With your left hand, take a strand in the center.
- One more strand is separated from the left and right sides (should be approximately the same thickness).
- The left strand is placed on top of the central one and passed under the right one.
- You need to ensure the strength of the weave so that the braid does not fall apart.
- On the right, take a thin strand of loose hair and connect it to the main one.
- An additional strand is taken from the left side and added to the main one.
- According to this pattern, weaving continues until the end of the hair.
- Once the braid is finished, the ponytail is fixed beautiful elastic band.

Option No. 2
- The hair is washed well, dried and combed. A tight ponytail is tied at the top of the head. You need to make sure that the hair is combed smoothly and that “roosters” do not form.
- The tail is divided into 3 approximately equal strands.
- The right strand is placed under the middle one. Then the left strand is placed under the middle one.
- A curl is separated from the loose hair on the right and added to the main one, then placed under the middle one.
- The free part of the hair on the left is separated and attached to the main one, then placed under the central one.
- According to this pattern, the braid is braided to the end.
- The top of the tail can be decorated with an elastic band or a bow. This is a reverse French braid that is perfect for almost any occasion.

Option #3
- Dried hair is combed to the right side.
- In the area of the right temple, take 3 not very large strands and braid a simple braid.
- The weaving continues to the left temple.
- At the end, the hair is wrapped in a thin curl and fixed so that the hairstyle does not fall apart.

For long hair
Option #1
- Clean and combed hair is divided into two equal parts.
- On the left, a part is separated from the main strand and placed on top of it.
- The actions from the previous paragraph are repeated on the right side.
- Additional strands intersect and connect to the main ones.
- The steps from point 2 are repeated again.
- According to this pattern, the braid is braided to the very end. This hairstyle is suitable for prom, but can be done for every day.
- To make the braid more voluminous, you can fluff it slightly by pulling out the strands.

Option No. 2
- The hair is combed well and parted evenly.
- On the right side, take 3 equal strands and braid a simple braid.
- To prevent these braided hairstyles from falling apart during the day, you need to gradually add strands from the bulk of your hair. As if weaving a braid.
- The braid is woven to the middle of the back of the head and fixed.
- The strands are slightly stretched, which gives additional volume.
- Using the same pattern, the braid is braided on the left side, but now it is placed on top of the first.
- The end of the hair is carefully fixed and hidden under the braiding so that the ponytail is not noticeable. This is the perfect hairstyle for little girls because it stays neat all day long and the hair won't get into your child's eyes.

Option #3
- The next master class will help you create a beautiful and stylish hairstyle. First, a fishtail braid is braided.
- You should not make the braiding too tight and at the end the braid is fixed with a simple elastic band, then it can be replaced.
- Just above the middle of the braid, one strand is pulled out and a not very large loop is made.
- The same loop is made on the opposite side.
- The ends of the elongated strands are used to secure the bow so that it does not fall apart.
- The ends of the strands are carefully masked, tucked into a braid.
- You can make several bows using this pattern.

Option No. 4
- The hair is combed and 3 strands of equal thickness are taken from the top of the head.
- During weaving, additional strands are added on each side.
- The braid is woven to the middle.
- The braid at the back of the head is woven using the same pattern, but in an upward direction.
- Two braids are connected into a ponytail and tied with an elastic band.
- A loop is made from the tail, which is divided into 2 parts.
- In the middle, the loops are intersected by the remaining hair, and neatly secured in the shape of a bow.

For medium hair
Option #1
- Dried hair is combed and straightened with an iron so that the curls are perfectly smooth.
- In the area of the temples, on the right and left, one strand is taken, which are fastened at the back of the head with an elastic band.
- The tail is passed inside, flagella are formed.
- Once again, a strand of hair is taken from the right and left, which is secured at the back with an elastic band. The tail is passed inward, again forming flagella.
- Another tail is made using this pattern.
- At the end, the hair is gathered into a ponytail and combed.

Option No. 2
- The hair is combed well and, if necessary, straightened with an iron.
- 2 strands of approximately equal volume are separated.
- On the right side, near the temple, take the third strand and throw it over the second.
- On the left side, near the temple, take the fourth strand and throw it over the first.
- Using the same pattern, the fifth and sixth strands are added and the braid is braided to the end.
- At the bottom, the ponytail is tied with a thin elastic band and the hairstyle is completely ready.

Beautiful weaving
Option #1
- Washed and dried hair is combed. A small piece of hair is taken from the back of the head and a ponytail is tied with a thin elastic band.
- The tail is divided into several equal strands. 2 additional strands are taken near the forehead and the process of weaving a simple braid begins.
- During weaving, strands from the tail are gradually added.
- The braid is woven to the back of the head.
- According to this pattern, the braid is woven on the left side.
- At the back of the head, the braids are connected and braided as one until the end.

Option No. 2
- First, the hair is combed well, then a strand is taken and placed on the index finger of the left hand. The second strand is pinched between the index and middle fingers. The third is between the middle and ring fingers.
- The third strand is passed under the central one, and the first is placed on top.
- An additional strand is taken from the left and right sides, which are added to the main ones.
- According to this pattern, the braid is braided to the end, leaving loose curls below.

Option #3
- On well-combed hair, a side parting is made on the right side. Take 4 strands of approximately equal volume.
- A simple braid is woven.
- Having reached the back of the head, you need to use loose curls on the left side for weaving.
- As soon as the braid is braided to the end, it is twisted into a neat circle.
- Pins are used for fixation.
- This hairstyle is ideal for both daily use and special occasions.

Option No. 4
- To braid African braids, you need to carefully comb the strands and part them.
- A small area is selected in the back of the head, and a thin strand is taken.
- The strand is combed well and a Kanekalon thread is taken, which is pre-whipped into a tangle and attached to the roots.
- Then the strand is divided into 3 approximately equal parts and the tightest braid is braided. Once the level is reached natural hair, a little Kanekalon is woven into the strand. Thanks to this, the braid acquires a uniform volume.
- You can fix the end of the braid different ways- rubber band, glue or bead.
Using this technique, you can not only braid straight braids, but also create a wide variety of patterns directly on your head.

Option #5
- The hair is carefully combed, straightened and parted. 3 thin strands are taken from the top of the head and the braid begins on the left side.
- Additional strands are gradually added.
- According to this pattern, the braid is braided on the right side, but in the middle the hair remains untouched.
- A simple thin braid is braided in the middle.
- 3 braids are connected together and secured with small hairpins so that the hairstyle does not fall apart.

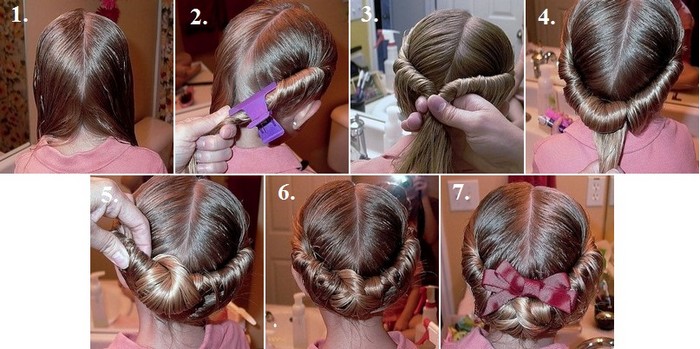
With ribbons
Option #1
- The hair is combed well, and 3 strands of equal thickness are taken from the top of the head.
- A tape is fixed on the central strand and a tourniquet is made.
- A simple braid is braided around the head, and a bun is tied at the back of the head.

Option No. 2
- Two tight braids are braided.
- Take a ribbon and fix it in the braids. All actions must be careful so that the hair does not become disheveled.
- Using a pencil, the ribbon is tucked into the braids and then tightened.
- The result is one thick braid, accessorized with a colorful ribbon.

How to cut your hair? How to lay it? What to think of for tomorrow? These and other questions are well known to parents of girls.

As an answer, we offer a lot of material about haircuts, tricks and accessories. We will also take a closer look at hairstyles for girls for every day and for holidays. In general, with such guidance you can go into battle... that is, to school or kindergarten. And perhaps mothers will adapt some of this for themselves.

Children's haircuts for girls
Against the backdrop of a wave of adoration that overwhelmed girls with long hair, more short haircuts seem forgotten. However, this does not mean that you should write off a graceful bob or fluffy bob. It is recommended to leave shoulder length for hair that holds its shape well.


If your hair always looks disheveled, you should think about a garcon with accentuated ends.


Simple, but at the same time stylish and flexible haircuts that maintain volume at the top of the head and reduce it at the back of the head are loved by girls of all ages.


Hairstyles for girls in kindergarten
And now it's time to talk about styling. Let's start with the most difficult category - preschool babies. There are many problems with hairstyles for girls in kindergarten:
- the hair is still too thin to achieve volume;
- It is difficult for a child to sit in one place for a long time and not turn his head;
- The styling tends to fall apart during active games.
There are no universal solutions, but a few colored elastic bands on hand and 15 minutes to braid a few braids will save many families.


And little fashionistas also love to follow the example of their mothers. Therefore, calmly repeat the buns on their heads and do not forget about fashionable bows.


Actually, the bow is one of the most loyal friends until the baby grows up to the “serious” second grade. An alternative to Bantu is cute “ears” on a wire base.


Hairstyles for girls at kindergarten graduation don’t have to be complicated. Wrap the strands around the headband or simply hide it among your curls.


If time allows, you can choose more magnificent knots and strands.


Girls' hairstyles for kindergarten graduation should be decorated with flowers, abandoning more complex decorations made of metal or ribbons. An exception may be imitation lace or a thin tiara.


Hairstyles for schoolgirls
Of particular interest are hairstyles for girls for 4th grade graduation. Not yet adults, but not quite babies anymore, young ladies usually order “something cool.” A crown made of braids with butterfly decoration, a large bun with decor, or a bun with a natural bow can become so cool.


In general, hairstyles for 10-year-old girls should assume that their owners still cannot sit still all day. So the hoop will come in handy more than once.

The older the girl gets, the simpler the styling becomes. Hairstyles for girls for school are usually not full of hairpins and do not surprise with intricacies. The best option is an asymmetrical accent in the form of three braids.


The boho school style is embodied by hairstyles with braids oriented diagonally (48, 53, 12).


And by February 14, the hairstyle can be made romantic by decorating it with hearts made of thin strands stretched to the side. 

Braiding for girls
Today, weaving has completely moved from the category of symbols to artistic elements. Hairstyles with a ponytail or bun, which is continued by a voluminous braid, are very popular.


And also on the cutting edge of fashion are hairstyles with several braids connected by ribbons. The result is a stitch effect that will be an elegant highlight for a special event.


If we talk about simple “drawings”, then the undisputed leaders here are the “fishtail” and the “Danish braid”.


The third place is gradually being won by a twisted braid, which is made from several strands.


The combination of several types of pattern is also very important: it allows you to create a strict but effective image.


Finally, I would like to remember the good old mesh of braids, suitable both as a hairstyle for girls in 4th grade and for a dance performance in 9th grade. Strands from this design do not get out and do not interfere.


If time is limited, it is enough to braid 2-3 “paths”.


Easy hairstyles for girls
They are usually built on a side parting, which is complemented by braids, a bun or flashy jewelry. The styling will be filled with special charm thanks to the curls.


Ponytails are perfect hairstyles for girls in 5 minutes. We intercept the strands with elastic bands in several places and get a ready-made cute look. From such segments you can create a braid.


Don’t underestimate the possibilities of plaits, since they can also decorate short hairstyles for girls.


DIY holiday hairstyles for girls
Don’t quite understand how to weave or pin up strands correctly? Let's look at the component hairstyles for girls step by step.
Herringbone braid
For the base, we will need to braid a braid, for which we will need 3-6 transparent elastic bands (if you have green ones, those will do). Like many beautiful hairstyles for girls, this one does not require any special skills or knowledge.

We comb the hair smoothly, lift the top third and fasten it at the back of the head with an elastic band. Divide the resulting tail into an upper and lower bun. We, in turn, also divide them in half. Next, the scheme is as follows: we outline the upper halves with the lower halves, secure with an elastic band, stretch to the sides (you need to stretch immediately, and not when the braid is braided - otherwise the strands will be asymmetrically pulled). And so on - to the back of the head.

Remaining? we collect hair in a low ponytail. We pass it through the weaving so as to cover the bottom elastic band.
Now we need decor for our “Christmas tree”. It is better if there are more than 3 studs - this way they will not look random. They need to be pinned into the base of the “trunk”, that is, in the place that is fixed with an elastic band.

That's it, now the basis for a festive hairstyle for girls on long hair ready.
Corrugated braids
An option for all those cases when you want something unusual, but have little time left to prepare. Such children's hairstyles for girls (the photo gives us an approximate estimate of the scope of work) will take about half an hour.
We divide the hair into a “toothed” parting.

We braid the braids on the sides: to do this, add hair at the temple to the strands of “teeth”; secure with an elastic band.

We temporarily set aside the central part. Now we process the weave and the ends below the elastic with a curling iron (if it’s more convenient for you, you can first make the strands corrugated and only then braid).


We bring the braids together at the back of the head, remove one of the elastic bands, and fix the braiding with the second. We wrap a loose strand around the structure so that nothing hurts the eyes.

Double “chain”
There are hairstyles for girls, photos and just the appearance of which always attract increased attention. “Chain” is one of them. What’s remarkable is that it won’t require much time.
We divide the hair into a middle parting and form two symmetrical ponytails on the sides. From the top of the ponytail we pick up two thin strands and tie them into a simple ordinary knot. We lay the hair in the direction of the second tail. After 4-6 cm we tie the strands into a knot again. We repeat until the ends can be hidden under an elastic band or pinned with a bobby pin.


We weave the same “chain” from the second tail. After this, we collect the loose hair into spiral strands and slightly stretch the “snails” to the sides. The tails are secured inside with bobby pins.


Please note that children's hairstyles for girls with long hair can be repeated for middle length- the chain will simply consist of two halves.

Waves like a princess

Often the most favorite children's hairstyles for girls are with curls spread over the shoulders. To do this styling, you will need to occupy your little fidget for at least half an hour, because you will have to sit motionless while you handle the curling iron.

We put dry hair up. We start the work from the lowest strands, winding them onto a curling iron in a spiral. As we already wrote, girls have thin hair, so there is a temptation to curl the entire layer, but you shouldn’t do this. Divide the layers into 3-4 parts.

Straighten the finished curls with your fingers. You shouldn't use a brush, even a soft one, as the curls can straighten out.


Your head is a little buzzing, isn't it? But it’s tempting to try weaving for girls, the photo of which you noticed a little earlier. Actually, this is why we collected so much material.
(Visited 149 141 times, 2 visits today)

 When weaving, it is important to take into account some features of children's hairstyles.

To braid beautiful braids you need to consider some rules:
- To make it easy to comb your curls, you can use a special spray.


Advice! It is easier to braid washed and slightly moistened strands. But you cannot use adult styling products.
Braids and spikelets for school
Performed at home different variants braiding hairstyles for girls. In the photo and video you can see what the weaving process consists of step by step. There are many styles of braids, from simple to unusual and intricate.


The easy way weaving of three braids is performed taking into account certain features:
- The strands should be of equal thickness for the hairstyle to be neat.
- Before braiding, the curls need to be moistened with water and combed to make them more manageable.
- When creating a French braid, you need to grab thin strands to make the braid stronger.
- The finished braid is tied with a regular elastic band and then decorated with a ribbon or bow.
- To add strength to your hairstyle, you can fix the weave with varnish.
Simple hairstyles for every day include the traditional braid, French braid, pixie braid, twist braid and inside-out braid.


Advice! A large number of hair clips and hairpins can cause damage to the hair structure and scalp. Therefore, it is better to use safe accessories.
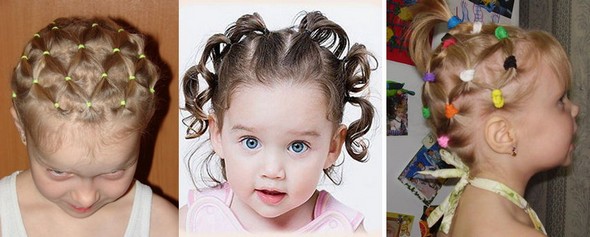
Ideas for little princesses
If you learn how to braid beautiful plaits, braids and asymmetrical hairstyles, you can create a magnificent creation on the head of a little girl. In this case, different fashionable accessories: ribbons, combs or headbands.
Advice! To create a tight braid, it is recommended to moisturize your hair. There are special mousses for children.
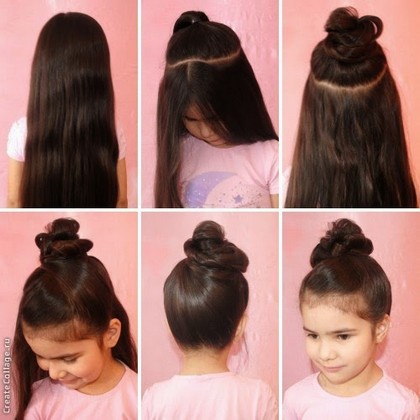
Original braided ponytail
A beautiful hairstyle in a fantasy style will delight your child. In this case, a tail is made in combination with a lace braid, which is created in several stages:

- A tight tail gathers at the top of the head.
- Then several strands are separated from it and begin to weave.
- In this case, thin strands are added from the base of the tail.
- The braid wraps around the tail.
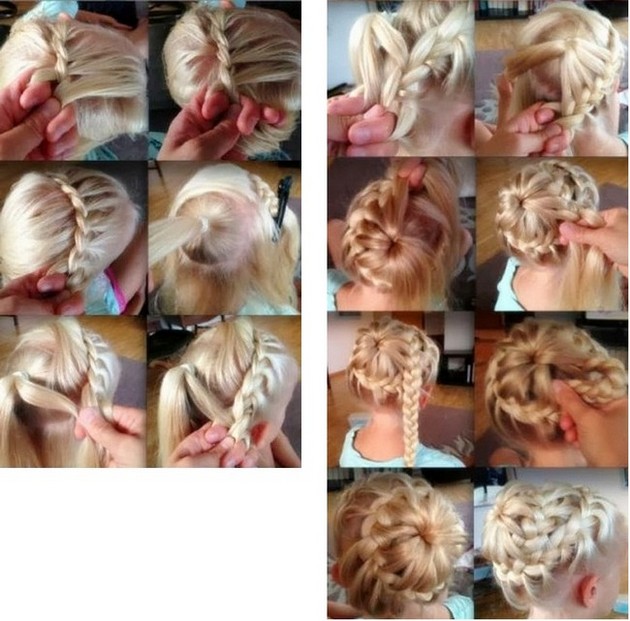
Unusual Eight
The original version is a figure eight braid, which is performed as follows:

- A straight parting is made in the middle.
- The separated strands are gathered into ponytails and tied with elastic bands.
- A braid is made from each tail.
- Then one braid is threaded through the other to create two loops.
- The tails are attached with elastic bands at the base.
Convenient spikelet
Beautiful braiding for girls is a spikelet around the head. In the photo you can see how it is done step by step:


- A large strand is highlighted on the top of the head, an even parting is made and the strand is tucked into a ponytail.
- The curls are separated on the sides.
- The spikelet is braided on the side of the temporal lobe. In this case, several strands are pulled out from the head of the tail.
- The end of the braid is decorated with a beautiful hairpin.
Magic lantern
Weaving lanterns is suitable for a festive event. It works like this:


- The strands are combed with a comb.
- The tail is made from the top strands.
- A small strand is separated and wrapped around the base of the elastic, and the tip is pushed into the ponytail.
- The curls from the upper ponytail are thrown up.
- At a short distance from the upper tail, the lower one is performed.
- Both ponytails are connected with an elastic band and wrapped in a strand that needs to be tightened a little. The ends of the strands are tucked inside the tail.
This way you can make several lanterns.
Options with ribbons
In order to weave a braid with a ribbon, you need to choose the right material. It is better to use accessories made from natural raw materials. If the ribbons are brightly colored, they should be washed before use. This is done to prevent shedding.


The width of the product also matters. The optimal option for weaving into hair is 15 mm. The ribbon should be longer than the length of the hair.
First, you should try a simple version of braids with a ribbon:
- The hair is divided into three strands.
- A ribbon is tied around the middle curl.
- The first strand is superimposed on the second. Then it is threaded under the ribbon and a third one is applied.
- The ribbon stretches under the central curl and is inserted between the third and second strand.
- All the hair is braided and secured with an elastic band.
- To make the hairstyle openwork, the outer strands need to be pulled out. After finishing the weaving, the result can be secured with varnish.


Advice! The braid should look natural. There is no need to use a permanent product, as this may result in a crust.
Simple braids for every day
Weaving simple braids for girls is popular. The photo shows the original options. Simple instructions will help you make step-by-step options for every day.
Advice! To help the girl withstand sitting in one place for a long time, you can show photos of the finished hairstyle or turn on a cartoon.
Ordinary braid
To make a traditional braid, you need to divide your hair into three sections. Then the left part overlaps the middle one and crosses it. The same actions are performed with the right side. These manipulations must be performed until a small tail remains. The resulting braid needs to be secured with a bow, a hairpin or an elastic band.

French weave
French braids for girls are considered original. In the photo you can see hairstyle options. By following the instructions, you can perform all the steps step by step.

Before you start weaving, a strand in the form of a triangle is separated from the middle of the forehead to the top of the head and secured with an elastic band. On each side, small strands are separated from the sides and intertwined with the main part. Then they separate and intertwine again. Having thus reached the back of the head, the usual weaving of three strands is performed.
Elven hairstyle
This type of braiding is made from thin regular or French braids, which are woven on the sides and attached to the back of the head. There may be several such braids. At the back of the head they are connected with a hairpin or gathered into the main braid.

Original harness
This hairstyle is considered a stylish replacement for the traditional braid. To make a braid, you need to comb your hair and braid it into a ponytail. Then it is divided into parts. In this case, the right part twists three turns to the right, and the left part also turns. Then the strands are intertwined and a small tail is left. The hairstyle can be secured with a ribbon or elastic band.


Beautiful buns based on braids
For a festive event, you can make a spectacular high bun braided with a braid. To create it you need to prepare two elastic bands, hairpins and a donut. Weaving consists of the following stages:
- The strands are gathered into a high ponytail at the crown and pulled through the donut. In this case, you need to leave a strand on the side to create a braid.
- The strands are distributed around the donut.
- A braid is woven from the remaining curl. Then the strands around the donut are selected and woven in the manner of an inverted braid.
- The strands need to be pulled loosely. In this case, the braid should lie evenly around the base of the bun.
- Finally, the braid is completely wrapped around the bun, and the end is secured with an elastic band. Hair can be additionally secured with hairpins.


You can weave a quick bun from ordinary braids in just 5 minutes. In this case, you will need bobby pins, hairpins and thin elastic bands. First, two tails are collected at the back of the head. Then two braids are woven from them, which are secured with elastic bands. Then a bun is made from one braid, and then a second braid is wrapped around it and secured with bobby pins.
The buns can be decorated with beautiful hairpins.
Advice! Even if the braid has not come undone during the day, you still should not leave the braided hairstyle in place for more than eight hours. Hair needs to be given a rest.
Hairstyles with braids for short hair
You can also braid hair on short hair. To make them last longer you need to braid them tighter.


With a regular braid, you can do the following:
- Two braids are braided along the usual parting and decorated with bows.
The hair is divided into 4 or 6 parts and braids are made from them. Then all the braids are gathered into one ponytail. - The hair is divided into two tails, and then a braid is woven from each tail. Each weave is wrapped around an elastic band. As a result, you get two beautiful buns from braids.
Advice! To create an openwork braid, when braiding, individual strands need to be slightly pulled out.
Braids for medium hair
For medium length hair there is a large number of interesting weaving options.
 Heart parting
The following simple hairstyles are worth trying:
- All strands are collected into a ponytail and divided into two parts. Each strand is twisted into a bundle and secured with an elastic band. Then the two strands are intertwined and secured with a beautiful elastic band.
- The waterfall has a simple design. First, a side parting is made. A braid is woven from a small strand, but left hanging at the back of the head, then the remaining strands are also not braided to the end. All the lower strands hang down, and the result is an imitation of a waterfall.
- Crossed braids look stylish. The technique is simple: the hair is divided into many ponytails and secured with elastic bands. Each tail is braided and intertwined with others in a lacing style. In this case, the ends of the hair can be curled or left loose.
 Beautiful and unusual hairstyle
Options for long hair
A variety of braids are braided on long strands. In this case, only weaving elements can be used. The headband of hair looks beautiful. It works like this:
- Strands are separated from the frontal part of the head.
- The remaining curls are collected in a ponytail.
- The hair begins to be braided from the side and, as it were, in a circle.
- You can complete the braiding with a regular braid. The tip of the hair is hidden inside.
- The rest of the curls can be loosened.
 Hippie hairstyle Hairstyle for a celebration
 Advice! An interesting option is the fishtail hairstyle. At the same time, the smaller the strands are taken, the more beautiful the hairstyle will be.
Should be simple and understandable, easy and fast. They should also be comfortable and practical, so that they do not disturb the child under any circumstances, and also provide aesthetic pleasure from wearing truly beautiful and comfortable hairstyles. Modern little fashionistas often want to choose for themselves what will be on their heads today, and, accordingly, adults will have to try to make all the wishes of the little princess come true. In this article you will find a lot of options for simple hairstyles and you can always please your child with a variety of styles without going to salons and without spending hours of time on it.


Choosing a hairstyle for a child:
- If the hair is thin: braids are contraindicated (strong pressure on the roots).
- If the curls are soft and wavy: good half-up styles, and braids are also not suitable (all the zest of such hair is lost).
- If your face is wide, square or rectangular, you can have short haircuts, but sleek and smooth styles will not work.
- If you have a high forehead: bangs are a must.
- If the face is narrow, elongated: you can have short haircuts, but the volume at the temples is important (this can be bows, flowers).
- If you have a large volume of hair, it’s lush: braids are perfect (they remove excess volume).

For long hair
Good, shiny long hair on a little lady is, of course, the pride of both mother and child. They are very decorative for girls and are an indicator of health, both in general and hair in particular. But when choosing your next hairstyle, don’t choose one that’s too complex or hung with lots of elastic bands, bows, or involves curling the entire head—don’t torment either the child or the curls. The consequences can remain for a long time and will take many years to recover.

The easiest installation method is loose hair , but this is not very practical, especially for kindergarten-age children. But the showiness of loose hair is difficult to replace with something, and often you really want just such an option. And here you can collect your hair a little, at least in some places: for example, tie it up to keep your hair away from your face; a headband will also work. You can also attach bow clips to the sides to secure side strands. To make your hair more impressive, curl the ends of your curls, but use soft curlers and dry your hair naturally.

 Celtic knot


Braids and weaving . Long hair provides incredible ground for imagination on the theme of weaving. There are a million options that can be implemented. Here are some instructions:
- Braid one regular braid on each side (you can use strands) and connect them at the back, near the back of the head, into a ponytail. Tie with an elastic band. Wrap the ends of the braids around an elastic band and form a basket. The loose ends can be left loose, or you can braid 2 additional braids and add them to the basket.
- Divide the hair in half with a side parting. In the lower part we make 3 ponytails at the same distance (if possible, make more). We twist each ponytail into flagella. We connect them with the rest of the hair and make a side ponytail. We divide the tail itself into strands and twist a tourniquet from each. We lay each flagellum in the form of a loop and secure it at the base with thin elastic bands. You can decorate your finished hairstyle with a small flower.


Simple tails a good option for everyday hairstyle. By adding some interesting details, it will turn from a simple and ordinary styling into something bright, original and will sparkle in a new way.


 Divide the hair into two halves. Separate the strands located at the level of the middle of the ear and above. Make a ponytail from the lower strands, but do not tighten the elastic. Make a hole in the hair behind the elastic band and pass the end of the ponytail from below through this hole. Pull so that the elastic also comes out through the hole to the top (the base of the ponytail should curl). Tighten the elastic band.
Select a new strand above the finished ponytail. Make a ponytail and also pass the end through the hole, but also grab the end from the first ponytail. Repeat the same steps with the third ponytail. The remaining ends can be styled in a bun, a knot, or a simple ponytail.
For medium hair
Medium-length hair is the golden mean: there are a sufficient number of styles for it, and caring for it is much easier than long hair, it also tangles less and dries much faster. The most popular hairstyle for medium hair is the bob cut. It does not require any styling and is therefore quite popular among mothers who find it difficult to braid their hair every morning. The only thing you can do to complement your hairstyle is a hairpin or a pair of hairpins crossed criss-cross and secured to the side. Any styling needs a twist.


Wreaths and scatterings of flowers . Form a high bun from the entire mass of hair and secure it. Place a wreath and a headband with flowers on top, so that the bun falls in the center of the accessory. Headbands and wreaths with flowers can also be worn on loose hair - this is a lovely, fresh addition to summer styling.


Naughty ponytail. Tie the ponytail to the side, at ear level. Decorate it with a bow or curl the ends a little.

Other styling options: braids, plaits, roses, bunches . Combining these elements into a single hairstyle. Addition of multi-colored elastic bands. In general, all manifestations of imagination will help you.


For short hair
Short hair is certainly not long, but it can also be styled beautifully and with a twist. Of course, there are not many options, but those that exist will help diversify your everyday look and add new emotions!
So, the simplest options: loose hair
, you can play a little with the parting (oblique, torn, zigzag), adding all kinds of accessories. Hoops (simple or decorated with some cute detail), headbands or ribbons (with long ends it will look very interesting and unusual), hairpins (they are collected in groups and all the necessary strands are secured with them). 
Funny ponytails
: one, two, three - as much as your heart desires. They look incredibly cute, light and relaxed. Instead of elastic bands, you can add bows. A ponytail at the back of the head is well suited for active girls (for walking and playing sports), as it allows you to quickly collect your hair and at the same time holds perfectly and does not fall apart even with the fastest movements. 
The main element with which you can diversify the hairstyle itself and generally increase the number of hair styling options is accessories. There is a wide variety of them today. For short hairstyles The ideal option would be headbands and ribbons. Only the bangs will need styling, the rest of the hair needs to be combed back and a headband attached to it. Pay special attention to what the accessories are made of. They shouldn't have sharp corners, be soft, not tight, do not stain the scalp. 
They will look very original on short hair braids. You can braid a French braid in a circle - from temple to temple. Or you can divide the mass of hair in half into a parting and also braid braids from the parting to the temples - you will get an openwork headband of braids. All this is charmingly decorated with flowers or ribbons. Looks amazing.

For very little girls
Beginning with kindergarten girls can already do interesting and varied hairstyles and styles, since by this age the hair is already quite a branch for mother’s experiments on hair and the embodiment of long-standing desires to decorate her child. Hairstyles for such young children usually consist of simple elements, complemented by accessories, and no chemicals are used in any case. Hair health and wearing comfort come first!
Pull your hair into two or three high ponytails and tie them with colorful elastic bands. Such hairstyles for very young children should benefit from color and brightness, and not from the complexity of weaving.


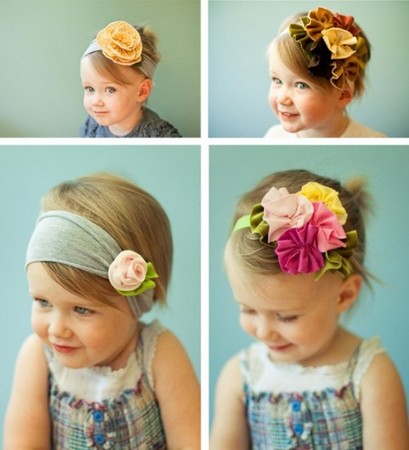
Long bangs can be tucked under the headband (pinned with a funny hairpin) or made into a small bow with a beautiful elastic band. It turns out very cute and funny. 
We make a ponytail at the back of the head. Wet the end of the ponytail with water. Roll it around your finger and blow dry it (use a cool setting to avoid drying out the ends). You should end up with a graceful curl.
If the length allows, then you can try to braid small braids. We decorate each braid with thin multi-colored rubber bands or bows. The main thing is not to overload your child’s head with accessories and bulky, bulky styling - all this will only disturb him!


For little schoolgirls
You can’t wear anything to school, both in terms of clothes and in terms of choosing a hairstyle. School clothes should be serious, laconic, without unnecessary elements and neat, so that nothing distracts the young schoolgirl from the learning process. Naturally, festive options, too voluminous hairstyles, brightly colored hair, non-standard hairstyles (various fashion trends) are not suitable for school.

The most common hairstyles: simply loose (but this may not be very practical), various kinds of buns and ponytails, braids and weaves.
Princess Jasmine's tail from the cartoon: braid a regular ponytail, comb it, and tie it with thin elastic bands in several places.
Bun: Braid a regular bun, but loosen it slightly, but not too much. This is very relevant today and looks fresh and interesting. This bun is very feminine and highlights the delicate features of the face well.


The tail is the opposite. Tie a regular ponytail - not a tight one. At the base we divide it in half and insert the lower part of the tail into the resulting hole. In principle, you can leave it like that, or you can form a lower bun by once again wrapping the end of the ponytail to the base and decorating it with some kind of hairpin or simply securing it with hairpins.

- Preparing hair for styling: First, wash your curls with shampoo. Before rinsing off the shampoo, comb the hair with a sparse comb. After rinsing off the shampoo, pat your hair dry with a towel (do not rub) - all these measures are necessary to prevent tangling and minor damage to the hair and roots.
- for dry hair: after washing, be sure to apply conditioner.
- It is preferable to dry naturally.
- varnish and other styling products are contraindicated for children under 7 years of age.
- It is advisable not to use small hairpins and hairpins in hairstyles for very young girls - this is not safe.
- If you want to decorate your hair with a bow, then choose a small, neat bow, not a huge and fluffy one. A small bow to match the dress will be a wonderful and original addition.
- braids are perfectly complemented with pearls, ribbons, flowers and hairpins.
- hair should not get into the eyes - this is fraught with conjunctivitis and strabismus, and in general it creates great discomfort.
- if your hair is thin and long, then it will be very attractive to braid it and collect it in a high bun, and you can also decorate it with beads or flowers.
- If you really want curled curls, then it is better to use a more gentle curling method: in the evening, braid damp hair into tight braids.
- Children's hairstyles have one unpleasant property - they quickly lose their shape and fall apart. What to do?! Here you need to choose the right hairstyle. The best thing various kinds weaving - braids, baskets, snakes and spikelets. They withstand the child's activity well, while the hair is chosen and does not get into the eyes.
- It is advisable to distract the child with something during the process of putting the child down: he will not be bored, and you will get everything done neatly.
The long braid was known in ancient Egypt and Rome. Ancient fashionistas braided their long locks in various variations and designs. There are even known cases when, during festivals, Egyptian and Roman women cut off the hair of captured slaves and made them into unique braids for themselves. for girls was as popular as it is now.
Is long braid popular now?
As in ancient times, braids for girls with long hair still remain relevant on the world hairdressing catwalk, outpacing many other famous hairstyles in popularity. A hairstyle in an ethnic style is universal; it is worn by both schoolgirls and older ladies. They are appropriate both at work and in the evening somewhere in a club or disco. Such hair will prevent you from freezing in the cold season, and in the summer it will help you escape the heat and heat. In addition, hairstyles with them are the most romantic and feminine design option.
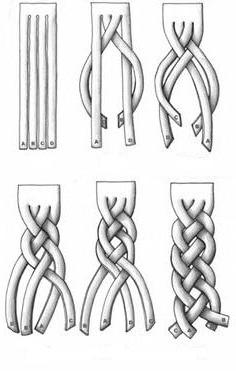
Previously, such hairstyles used three strands, but after some time their number grew to four or even five, which are braided using various techniques such as a spike, a fishtail, or in the French style. Let's figure it out, girl?
What is the optimal hair length to start using braided hairstyles?
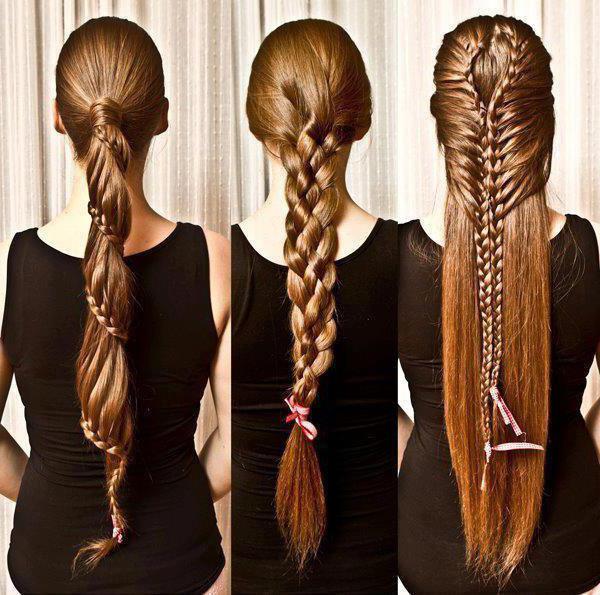
Everyone loves Photos of such haircuts touch and delight. Girls don't have to worry about the length of their hair. These hairstyles are suitable for most people. Hair can be curly or straight, medium or long. And the weaving technology itself is relatively simple and will not cause much difficulty for those who are new to weaving. And the most important thing is that it is possible to achieve all this stunning beauty without leaving your own apartment and without spending money on numerous stylists, designers and hairdressers.
What types and technologies of weaving exist?
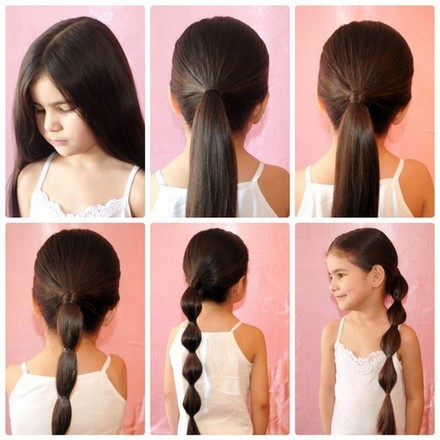
Let's start with the simplest option for long hair - a bun. The classic bun has long since managed to make more than one generation of fashionistas fall in love with themselves, but many have begun to get tired of the banal and uninteresting image. Therefore, we will consider a more interesting design option in order to diversify your image. This technique is considered the simplest and most widespread. All you need to get is a simple comb with small and frequent teeth, an elastic band and a light varnish. If you wish, you can stock up on some accessories to decorate your head. This is good for any holiday or celebration.
First, comb your hair thoroughly so that your hair is perfectly smooth. Form a tail. It must be divided into two parts, and they, in turn, must be braided in a classic three-strand manner and secured with elastic bands. The resulting braids are formed into a bun and secured with hairpins or barrettes. When finished, spray everything with varnish. Braids for girls with long hair can be decorated with additional decorations in the form of ribbons, bows or elastic bands.

in Dutch style
A girl's hairstyle in this style is braided with bangs. From the outside it resembles a headband and it is better to use long hair for braiding. To perform such a miracle on your own head, you just need a comb and a fixing elastic band. We start as usual by combing the curls and highlighting the bangs. We form the strands we don’t need into a ponytail. Weaving begins with the bangs themselves, according to the type of thinner strands woven into the main ones. In the case of, they will be intertwined with each other. The braid will look like it's turned inside out. This continues until all the hair from the bangs is directed in the opposite direction. After finishing, the braid is secured with tape or an elastic band, placed behind the ear and secured. When you're done, you can release the curls from your ponytail. Enjoy your haircut!

Fishtail braided hairstyles
Do you want to become a little like a little mermaid and go to a party or club like this? Nothing could be simpler. Mastering this style of weaving will not be difficult for fashionistas.

We comb our hair and divide it into two parts. We fix the one on the left with an elastic band, and we braid the one on the right in an inverted style and also fix it. We do the same with the right half and also tie it with an elastic band. What happened needs to be unraveled a little. This will add a casual look. We connect the final version using pins. We tie the ends with ribbons and fix them in any way as desired. Do you want to make your look more feminine and sexy? Add a headband or real flower to your braids.

Flower-shaped braiding for girls
Such beautiful braid For girls it is also performed on long strands. The flower is a simple basket-type option and is suitable for any type of curls. We comb our hair and create a perfectly even parting in the middle. In the area at the back of the head we select two parts. From them you need to weave braids and connect them in the shape of a flower. From one area you need to braid in a French style. It should be directed towards the forehead. You need to weave it until you reach the ears. At this moment the braid should turn into a simple, classic one. When you're done, tie it off. The same principle is used to weave the neighboring one. We combine them into one in the shape of a flower at the back of the head.

Unicorn braid
Braids for girls on long hair can be braided in a very unusual way. The image is reminiscent of a fairy-tale princess, which will undoubtedly appeal to everyone around. This type of hair is created by intertwining two strands in the form of strands.
Before you start, you need to gather all your hair into a ponytail. If they are medium in length, a low type tail is better, but if they are long, it is better to make it high. Wrap the resulting tail with an elastic band. It is divided into two parts and they are twisted like a tourniquet in two opposite directions, and then among themselves, resembling a rope from the outside. The resulting result is tied with a bow or any other decoration at your discretion.

Haircut in the style of a Greek wreath
Braids for girls for long hair in the Greek style look good on both curly and straight hair. The image of the ancient Greek beauty has always been and is very feminine. To do it, you only need to have a comb or comb with small and frequent teeth. With its help, we begin to form an oblique parting. On the left side of the curls, select one strand and divide it into three sections. Weave them together. When you have already braided three parts of the braid, you will need to add one more strand from the total number of curls. Going lower and lower, you need to continue weaving, periodically adding new strands. When doing all this, keep in mind that the braid should not turn out to be too tight. As soon as you reach the neck level, the last part must be twisted from three strands and secured. On the other side, separate one and divide it into three parts. We braid a pigtail. Weave loose hair into the braid in three parts and weave it into the strand closest to the face. As soon as you reach the temple area, start braiding again so that the hair at the back of your head is free. We secure the end of the ponytail. We lift the resulting braids up to the back of the head so that they form a kind of frame that looks like a wreath. It is advisable to tie your hair with a ribbon, elastic band or bow. Done, enjoy the resulting Greek wreath.
Haircut in the style of openwork braids
A good option to add originality, romance and tenderness to your image. This hairstyle is often seen at wedding events. This type of weaving is easy to learn, and installation does not require much of your attention and time. The technique consists of initial braiding and subsequent loosening of the braids. To do this, you will need a comb, preferably a massage type, an elongated comb with small teeth, hairpins and elastic bands, fixing agents in the form of gel, mousse or varnish. Don’t forget about the various accessories that children’s hairstyles are very popular with. Photos where braids are combined with different decorations are truly admirable.
As in previous cases, we carefully comb our hair, and at the top of the head we select an area with hair, which we divide into three strands and weave a standard braid from them. It shouldn't be tight. Having made several parts in it, pull out several strands from it and distribute them on different sides. Continue weaving as usual. Twist the resulting braid into a circle, making it like a flower or a bun. You can add an accessory on top of it if you wish.