
Gift box sketch. How to make a square box from cardboard? How to make a surprise box with your own hands, master class
And other concerns).
But recently I made a box as a gift and decided to post a small master class.
So let's do it surprise clamshell box.
The idea is this: a person receives a huge box as a gift, opens it, inside there is another smaller box, then another one, and so on until we have a tiny box with a small gift in front of us.
This packaging is very convenient when you want to give a small gift such as jewelry (ring), money or any other memorable gift.
The clamshell box solves several problems at once:
1. It looks impressive and does not create the impression that the gift is too small (this is for lovers of gigantism))));
2. It’s much nicer to receive such a box than just a banal envelope with money;
3. The box can be decorated with various wishes, photographs, small memorable items and becomes a repository of pleasant memories, and this, you see, is more valuable than even the gift itself.
What you will need for work:
1. Cardboard (binding or corrugated)
2. Wrapping paper is different
3. Decorative elements made of paper, wood, beads and anything else you want to decorate the box with.
4. Double-sided tape (thin and foam)
5. Paper glue (PVA, Moment Crystal or any other that you are used to working with)
6. Paper or masking tape of different widths
7. Scissors
8. Ruler
Working hours:
The time it takes to assemble a box depends entirely on the size. A box measuring 30x30x30 cm can be assembled in 1-1.5 hours (this is only one outer box!), smaller inner boxes can be assembled in 30 minutes to 1 hour. Plus add here the time for decorating - about half an hour for each box. In general, you can spend 10-15 hours assembling and decorating the entire package. Therefore, plan to create such packaging in advance; you definitely won’t be able to do it at the last moment.
I’ll say right away that this option does not pretend to be highly artistic, it was made quite simply and quickly, so we believe that this is a version of a simple clamshell box))) You can get confused and make a clamshell box that is ideal in all respects, but be prepared to spend a few on it full days, since working out the details will require an appropriate approach.
Begin?
1. Before starting work, decide on the size. I recommend starting with the largest, outer box, as this takes up the largest amount of material and can be used to plan the size of the inner boxes from there. It is better to make the box in the form of a cube, then it will be easier to calculate the dimensions - all dimensions of a cube are equal. Each subsequent box should be 3 cm smaller so that decor and a lid can be placed between the boxes inside. Also decide what size you should have the smallest inner box that will contain the gift.
2. Select base material.
Corrugated cardboard(from old boxes or purchased specifically in sheets) are much lighter, so the overall weight of the finished clamshell box will be relatively light. But keep in mind that the boxes will be larger, so the appearance will not be very compact and neat.
Binding cardboard much heavier, but it is smooth, sticks well and holds the paper, and is much thinner than corrugated, so the box will turn out smooth, beautiful and neat.
3. We will use 5 sheets of cardboard of the same size for the base of the box. In my case, these are sheets of 30x30 cm (in what follows I will give all sizes based on the size of my box).
We put one sheet in the middle and place 4 on its sides. Leave a small gap between the sheets (about 3-4 mm) so that the sides of the box can be laid out freely.

4. Use paper tape to glue all the joints of the sheets on one side, turn the workpiece over and do the same on the other side. Thus, we obtain a blank of 5 sheets, glued at the joints on both sides.

5. We are now working with the largest, outer box, so we need to glue the outer bottom so that the box looks decent from the outside.
Cut out a square measuring 35x35 cm from wrapping paper (it should be slightly larger than the cardboard bottom).

6. Glue strips of thin double-sided tape to the cardboard bottom, not too often and not too rarely, so that the paper sticks evenly.

7. Remove the protective paper from the tape and glue on the sheet of wrapping paper that we cut out in advance.

8. In the corners of the protruding parts of the paper, make cuts at an angle of 45 degrees.


9. Turn the bottom blank over, bend the corners and glue them to the base.


We bend the extra centimeters and glue them to the base. Here it is better to use glue, since you need to coat quite large areas of paper.
Before gluing the sides, you need to bend the corners of the paper so that the corners of the base look decent.


This is what the inside of a large box should look like after gluing the paper to the outside:


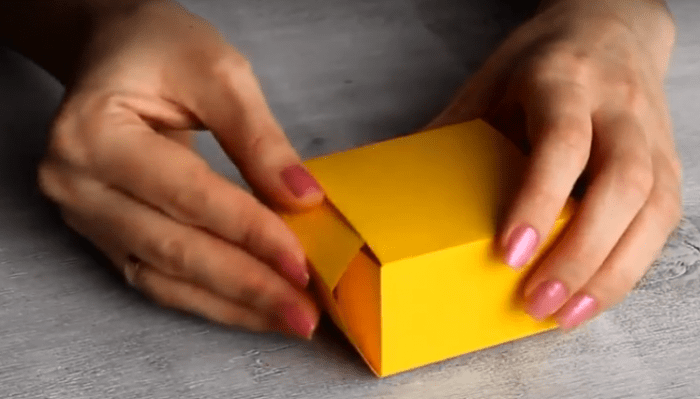
13. We have the base of the largest box ready, now we need to make the lid. We know that the size of our large box is 30x30 cm, so the size of the lid should be a centimeter larger. We cut out a square 31x31 cm and 4 strips measuring 31x5 cm from cardboard. Here 5 cm is the height of the lid, I took this size in particular because of the paper tape (I had it wide, 5 cm), so that it would be convenient to paste over and not need I had to constantly cut off the excess width. You can make the height of the lid smaller by adjusting it to suit your needs.
We lay out the cut out parts in the same way as when creating the base of the box, but close to the middle sheet (that is, we do not make gaps between the parts)

14. Cover the joints of the parts with paper tape only on one side of the workpiece

15. It turns out this design (we have glued joints inside)

16. Fold the corners tightly and cover them on the outside with a strip of paper tape. It is important to ensure that the parts are glued evenly and tightly - this directly affects appearance covers.


We get such a cute blank. By the way, you can “learn” this method of gluing at the post office - watch how they pack your box with a parcel, the principle will immediately become clear.


You should end up with a neat lid like this:

I successfully forgot to photograph the process of gluing the lid, but in principle this is worthy of a separate master class, since the process is interesting, but in order to have at least something, I am posting the process of gluing the lid from corrugated cardboard.
First you need to cut out a sheet of wrapping paper taking into account the height of the lid, that is, if the base of the lid is 31x31 cm, its height is 5 cm, then we cut out a sheet of at least 42x42 cm so that it is possible to seal the outer and inner heights of the lid:


19. Ufff. Are you tired?)) And we just made the first, biggest box! Go ahead. Each subsequent box needs to be made 3 cm smaller, that is, we cut out 5 sheets of cardboard measuring 27x27 cm.
Laying the sheets:
Cover both sides of the workpiece with tape


You should end up with something like this without the bottom covered with paper:

20. Now we glue the smaller box to the larger one. To do this, place the base of a large box on a flat surface, coat the bottom of the smaller box with glue and carefully glue it exactly to the center of the inside of the bottom of the large box. Like this:

21. Next, we repeat all the above procedures several times with a corresponding reduction in the size of the boxes. Here's what I got:
1 box – 30x30 cm, lid 31x31 cm
2 box – 27x27 cm, lid 28x28 cm
3 box – 24x24 cm, lid 25x25 cm
4 box – 21x21 cm, lid 22x22 cm
5 box – 18x18 cm, lid 19x19 cm
6 box – 15x15 cm, lid 16x16 cm
I didn’t make the box smaller, because... I needed to put an envelope with a gift card, and 15x15 - the smallest box was very convenient for this.
In general, you can make a larger number of boxes, increasing them, for example, to 9 pieces. Then the smallest box will fit a box with a ring or any other small gift.
22. Now we need to decorate all the boxes of our packaging.
We start with the smallest one, and in front of us lies this structure:

We decorate with congratulatory inscriptions, stickers and other decor, and insert the envelope right away!

We close the box with a lid (you also need to make decorations on the lid) and start decorating a larger box.

Close the lid again and decorate the following:


And finally, our big box!

To prevent the box from opening prematurely, it must be tied with a beautiful ribbon and solemnly presented to the recipient. Delight and tears of happiness are guaranteed!
Here is another small gif where you can briefly see the process of creating a similar clamshell box:

Useful tips
Sometimes you want gifts beautifully packaged so that the gift makes a pleasant impression.
Can be important present a gift beautifully so that it is remembered by the one to whom you give it.
On our website you will also find:
The gift can be wrapped in special stores, from people who have been doing this kind of thing for a long time.
But you totally can make beautiful packaging yourself, and this does not require any special talent or skill. You just need to learn a few rules and tricks.
Once you have mastered them, you will be able to make gift wrapping for any occasion, be it a birthday, New Year, anniversary, etc.
DIY gift wrapping. Origami packaging.


Make your own packaging. Machine.


Packaging for New Year's gifts. Cedar branches and cones.

You will need:
Small cedar branches
Thin wire
Jute rope
Wrapping
Decorations to taste
1. Make a small bundle of several branches and secure them with wire. Make another bun like this.

2. Now, using wire or fishing line, fasten two bunches of cedar branches with two cones.

3. Wrap the gift in wrapping paper, tie it with a rope and attach a blank of cedar twigs and cones to the rope.

You've got a beautiful gift wrapping for the New Year holidays.
How to wrap a gift with paper (photo)


How to wrap a gift with paper (video)
Packaging for sweet New Year's gifts. Original packaging with quilling elements.
This master class consists of two main parts: making a box and design, which is made using the quilling technique. You can put sweets in such a box and give them to children.

You will need:
Thick paper
Round plate or CD (any round object) - the larger the circle you have, the larger the package.
Simple pencil
Scissors
Creasing tool (or something similar)
Bright ribbon
Paper strips for quilling (width approximately 0.5 cm and length 60 cm)
PVA glue
Quilling tool (can be replaced with a toothpick)
Glitter or something similar

1. Making a box


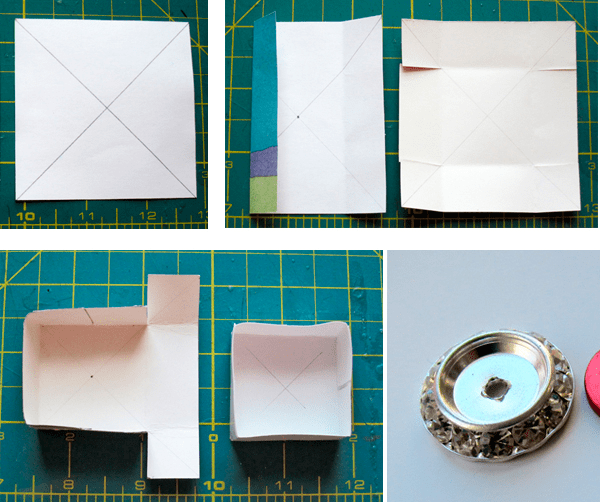
1.1 Prepare a sheet of thick paper and draw a circle on it. Draw two perpendicular diameters through the center of the circle.
1.2 Now through the indicated points A and B you need to draw another circle. In the new circle you also need to draw perpendicular diameters (see picture).


1.3 Use a plate or disk and a creasing tool to draw curves, cut and fold the paper along its contours.

1.4 Cut out the entire shape and bend along the curves.
1.5 Start folding the box.

2. We arrange the packaging
2.1 Using the quilling technique you need to make a bump. You will need half a brown paper strip and a third light brown. These strips need to be glued together.

2.2 For a cone you need to make a lot of scales - in this example from 18. This means that you need to make 18 strips as in paragraph 2.1. Start twisting the strips, starting with the one that is light brown.

2.3 Once you have a roll, you need to release it until its diameter is about 2 cm.

2.4 Make an “eye” shape from the roll (see picture). You've got a scale.


2.5 The middle of each scale needs to be squeezed out and immediately greased well from the inside with PVA glue. This way you will fix the volumetric part. Let the glue dry.
2.6 Glue 3 others around one scale. Next, glue the remaining scales in rows to form a cone.


2.7 To make a hat for a pine cone, you need to prepare three paper strips and glue them into one long strip. This long strip now needs to be rolled into a roll.
2.8 Thread a thread with a small loop through the middle.

2.9 Shape the roll into a cone and coat well with glue. Let the glue dry.

2.10 Glue the cap onto the pine cone and you can decorate the piece with liquid glitter that imitates snow.

All that remains is to put all the details together. Place a gift in the package and tie it with a bright ribbon. Hang the pine cone on the loop. You can add a couple of artificial fir branches.

DIY Christmas packaging. Decoration with yarn.
A very simple example of how you can decorate a gift using yarn.

You will need:
Green felt in the shape of a Christmas tree
Wrapping
Decorations to taste
1. Wrap the gift in wrapping paper and tie it with string. Leave a tail about 20 cm long.
2. Cut out a small Christmas tree from green felt. Make a hole in it and thread the yarn through it and tie a knot.

3. Add decorations: glitter, stickers. You can draw or write something yourself on wrapping paper.
Packaging for children's New Year's gifts. Father Frost.


Gift wrapping for New Year's gifts. Gift box.

You will need:
Empty box (from shoes, for example)
Wrapping
Scissors
Double tape
Adhesive tape

1. Prepare wrapping paper. It should be larger than the box on all sides. Place the box in the middle of the paper and start making cuts on the paper as shown in the picture, going all the way to the edge of the box.


2. Start wrapping the box by folding the paper inside the box and securing with tape.


3. Repeat the same with the box lid.
4. You wrapped the box, now you need to decorate it. This can be done in many ways and one of them is to use homemade garlands.
You will need:
Thick paper
Scissors
Shaped staplers
Superglue or PVA glue
* Cut out circles, stars and/or other shapes from thick paper. You can use regular staplers to speed up the process.

* Glue all the figures onto the threads as shown in the image. Choose the order of the figures yourself.

*After the glue has dried, wrap the garland around your gift wrap.

DIY packaging (diagram). Simple gift wrapping.

You will need:
Colored thick paper
Scissors
Decorations to taste.


Content
You can wrap a gift in a beautiful and original way with your own hands. The creation process itself will bring you a lot of positive emotions, and you will also save money and give a piece of your soul and love. To create a square box with your own hands from cardboard you will need very little effort, imagination, love and some tools and materials:
- cardboard (thin and corrugated);
- PVA glue, glue gun, office glue;
- tape (double-sided and regular);
- scissors and stationery knife;
- ruler;
- a pen that no longer writes;
- all kinds of decor.
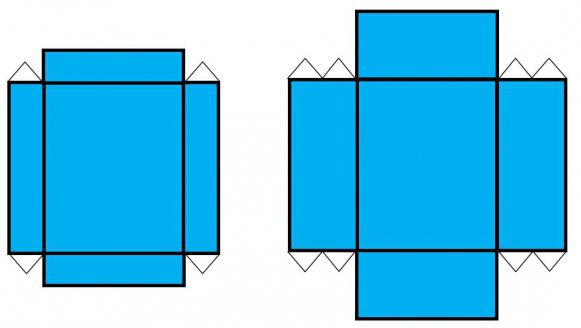
Ready template
Every cardboard box starts with a template. Without it, it will be difficult for you to create beautiful and neat gift packaging. We have prepared several box templates for you that can be used not only as packaging, but also as a box for storing jewelry, threads, needles and other small items. There are a huge number of template variations; you can come up with a design yourself. Our advice to you: first try to build a box from newspaper or thick sheets of magazine, and then take on the final version.

The template needs to be enlarged to the size you want the box to be. Then you need to print it and transfer it to cardboard. The dotted lines are the fold locations. Use a non-writing pen or the thick edge of a pair of scissors to follow these lines and mark where the folds will be so that the cardboard will give in easily and bend exactly the way you want. Making a square cardboard box with your own hands is as easy as shelling pears, especially if you use designs that do not require the use of glue:

We offer several more cardboard box templates that can be created without a single drop of glue.
It's all about special "hooks" with the help of which the structure holds and does not fall apart. Well, now let's get to the decor.
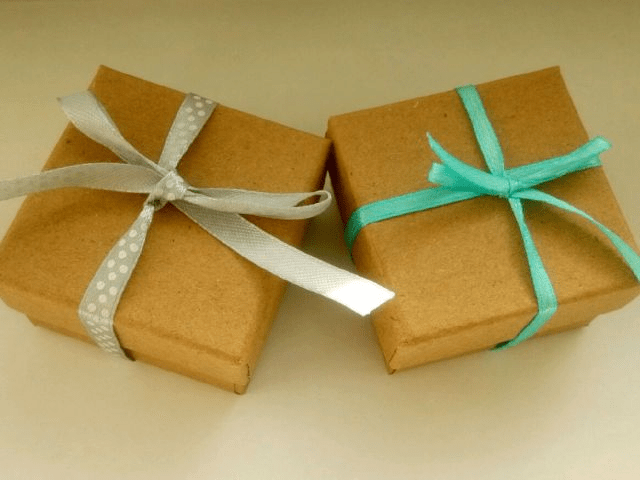
A square box made of cardboard with your own hands (especially if the cardboard is thick) can be decorated in a variety of styles and using different techniques. It could be decoupage, thick cardboard will withstand this technique, it could be a composition made using the quilling technique, flowers from various materials. You can also use appliqués, ribbons, beads, stones, rhinestones and other decor. Try to choose details in the same style so that the design does not look too rough and ugly. It is not necessary to completely decorate the box; sometimes just craft paper or the texture of the cardboard itself and an ordinary delicate satin ribbon are enough.
Don't forget to decorate the inside of the box too. Its finished appearance will depend on this. Inside the box you can put a soft satin pillow, decorate the inside with foil, wallpaper, gift paper and other materials.

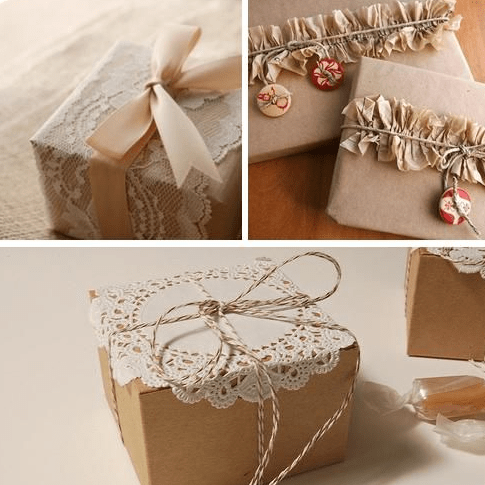
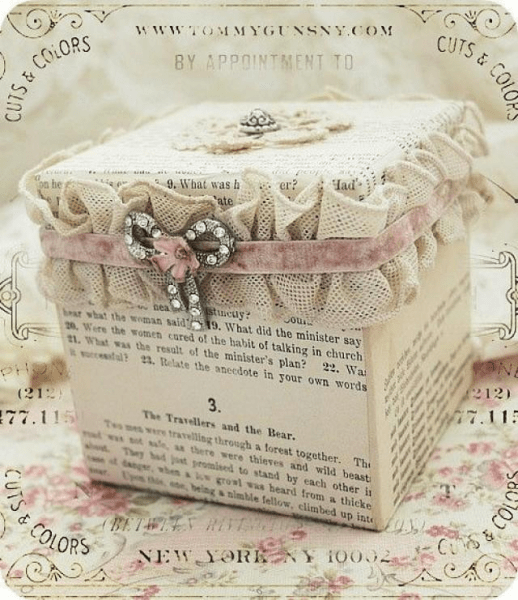
The lace material looks very beautiful in the design of the box - the packaging turns out to be in such a rustic or rustic style.

For decoration, you can also use burlap and thick wallpaper with an interesting print. Such boxes can be used to store things, small parts, and decorations. If you make partitions inside from cardboard, it will turn out to be a real organizer for jewelry, buttons and other small items, which can be presented as a gift.

Think about the hobby that the person for whom the gift is intended is interested in. Maybe he loves traveling and the box can be decorated with stamps, he loves flowers, then use a floral theme, he is a lover of cars and technology, then use some details characteristic of this hobby.
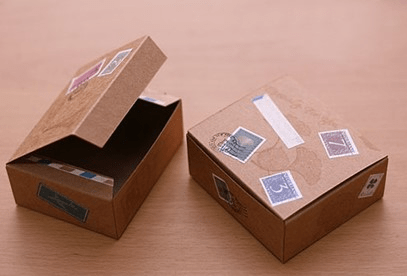
Even ordinary postage stamps can become an original design for a DIY cardboard box.
We create a template with our own hands
You can create a template for a square box with your own hands. To do this, you need to draw a square of the required size on a sheet of base material. Next, from each corner you need to draw straight lines as long as you want the height of the box to be. For the box you also need to make a lid that will be literally 2 mm larger than the packaging itself.
Use double-sided tape, PVA glue or a glue gun to join the cardboard pattern pieces together. You can also use thin multi-colored cardboard if your gift is not too heavy.
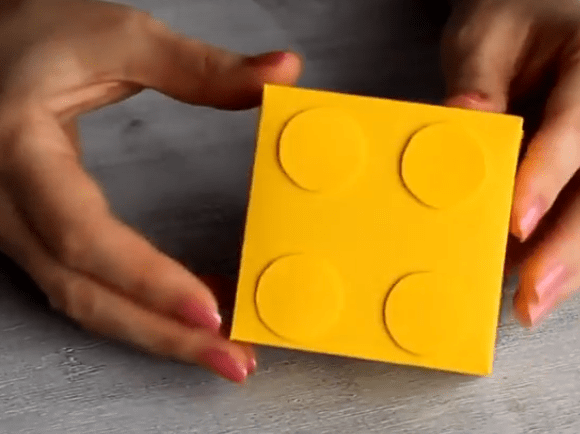
Cardboard box in the shape of a Lego piece
For this square box we will need fairly thin cardboard, which should be colored on both sides. Children will love this packaging; you can hide candy, designer toys, small children's jewelry, collectible cars and other souvenirs in it.
First you need to create a template, print it and transfer it to colored cardboard. By the way, the template can be immediately printed on colored cardboard.
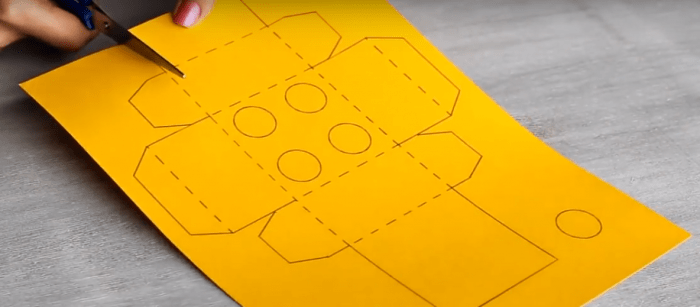
Next, you need to use blunt scissors along the folds so that the cardboard bends beautifully. And then you can start creating interesting packaging. Use regular craft glue to join the pieces together.

Now you need to cut out four identical circles from the same cardboard from which you are making the box. By the way, the size of the box will depend on the size of your gift. You can even make a traditional design: a box within a box. The child will be interested in opening one box and finding a new one in it.
Now you need to take a thick one duct tape or thick double-sided tape on which we will attach our round pieces.

You should end up with such an interesting box in the form of a Lego constructor.
Quick box
If you need to arrange a gift very quickly, but do not have suitable packaging at hand, then you can quickly make it yourself. In this case, use thin cardboard - it is more convenient to work with and the packaging is more accurate.
First you need to cut out a square from cardboard and draw straight lines from corners to corners.
Now carefully assemble your box and secure it with glue. From a slightly larger sheet (about 5-6 mm), make a lid using the same principle.
When preparing for a special event, a person always carefully thinks through his image, style, demeanor and, of course, the gift. It happens that the turn comes to the last one when there is practically no time left for purchasing and packaging it. In this case, the invitee begins to rush around in search of a gift, and when it is found, he puzzles over how to present it. If you no longer have time to go to specialized workshops engaged in gift wrapping, or to run to the nearest market to buy packaging, improvised materials and imagination will come to your aid.
Find out how to make a box out of cardboard, and perhaps these methods will save you in an emergency. Also, such accessories can be used not only for gift wrapping, but also for storing various household items. There are several methods for making cardboard containers.
Material selection
Before you make a box out of cardboard, you need to decide on the material itself. You can take an already colored sheet or decorate it later. If storage is intended heavy objects, then you need to take dense material.
The decoration of the manufactured box can be paper applications, drawings, various stickers or fabric. It all depends on for whom and for what occasion it is made.

How to make a rectangular box
Perhaps one of the simplest packaging options is a container rectangular shape. To make it you will need a sheet of cardboard, a pencil, a ruler, sharp scissors and hard glue.
Place the sheet in front of you and decide on the size of the bottom. Draw its boundaries using a pencil and ruler. After the preliminary drawing is made, it is necessary to sketch the sides of the box. To do this, draw a pair of perpendicular lines to the side from each bottom border. Remember that their lengths must be the same. On two of the future walls, draw a couple more segments located parallel to the bottom border. It is with the help of these parts that the sides of the box will be fastened together.
Carefully cut out the workpiece with scissors and bend it exactly along all the drawn lines. After this, you can begin assembly. Apply glue to additional sections coming from the walls and secure them by making the corner of the box. Let the glue dry and you can start decorating the container.

How to make a box (diagram of a round container)
The container looks more original round shape, but it is also somewhat more difficult to do. You will need a sheet of cardboard, a pencil, a ruler, scissors and glue, as well as a regular school compass.
Place the material in front of you and draw the required size of the bottom with a compass. Carefully cut the workpiece with scissors so that the borders are perfectly even. After this you need to make the walls of the box. To do this, use mathematical formulas or simple measurements to calculate the circumference.
Draw the resulting length on the cardboard with a pencil and make a rectangle out of it. The width of the sketch you create should be one centimeter larger than you need. Cut out the workpiece and, using scissors, make small cuts at the border, one centimeter deep. Next, you need to bend the created cuts and apply glue to them. After this, carefully place the bottom of the box on the glue and press carefully. Let the bonding agent dry and begin decorating.

Triangular option
There is a way to make a box without glue. In this case, it can be replaced with regular or double-sided tape. You will need cardboard, a ruler, scissors and a pencil.
Apply a triangular sketch to the selected material in such a way that all its sides are equal. After this, draw lines for future walls from each side. Since you can make a box without glue, there is no need to draw additional lengths that usually attach one side to the other. Cut out the carefully created blank and bend along all the available lines.
After this, bring the sides together to form an angle. Carefully place a piece of tape on it. Do a similar manipulation with all three sides. Next, you can start decorating the product.

Cubic packaging
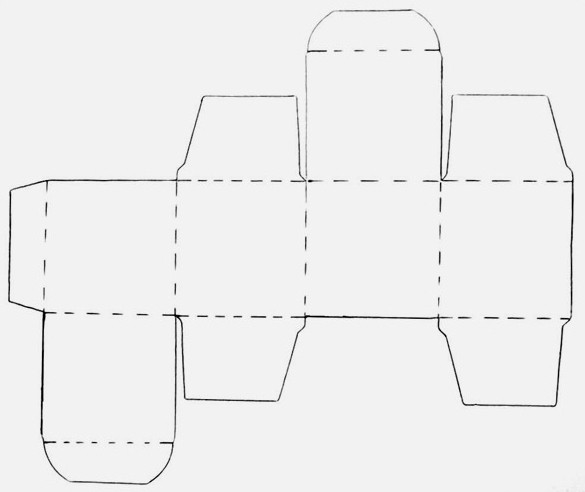
How to make a square box from cardboard? Nothing could be easier!
Prepare necessary tools- ruler, pencil, glue and scissors. Draw a square on the cardboard, then another square from each side. Do the same with each side. As a result, you will get five identical squares, one of which is in the center and borders on the others. On both sides, create small sections that will be attached to adjacent walls. Cut out the blank and carefully glue the sides together, having previously bent them along all the lines.
Do the same steps and create the same box, but the sides of the squares should be half a centimeter larger. Cut and glue it. Your box now has a lid. When closed, such a container looks like a cube.
Simple box
We'll tell you how to make a box out of cardboard without any improvised materials. All you need is a sheet of thin cardboard and your own skillful hands.

Fold the sheet in such a way that you get two folds that will divide the base of the future thing into three parts. After this, bend each extreme part in half inward. Fold the corners on the resulting elements. As a result, you will have four identical corners on each side.
Straighten the resulting part, aligning it with its center. You will end up with a container that has no corners. You need to make them yourself. To do this, gently press the sides of the box with your fingers. Next, you can begin decorating the created packaging, but remember that thin cardboard is not able to support heavy objects.

Before you make a beautiful box, decide on its decor. Prepare the necessary decorations in advance. Think through everything down to the smallest detail. Only after this can you start creating a form, drawing a picture or gluing applications.
If necessary, a suitable lid can be made for each box in a similar way (remember that it should always be slightly larger than the main part of the product).
Select the cardboard material in accordance with the purpose of the packaging. Make masterpieces with your own hands and delight your friends and relatives with them. Give them storage boxes and various gifts packed in them.
Good luck in this interesting work!